
GELCOAT REPAIRS
The next time you are cleaning and waxing your boat, take the time to look for small cracks, scratches and chips in its gelcoat. If your boat is more than a few years old, you’ll probably be surprised at the number you find.
The Diagnosis
Most scratches and chips in gelcoat result from impacts with hard objects (winch handles, downrigger weights, 15 lb. Lobsters) and are not cause for concern, but if you find a series of cracks, take a minute to inspect the area more closely. If the cracks radiate from the base of load-bearing equipment, like a cleat or stanchion, there is probably a problem with the installation that deserves attention before repairing the gelcoat. Solving it might be as simple as shifting a load from undersized equipment, or installing a larger backing plate to spread the load over a wider area. If cracks appear at important joints or intersections in the cabin or deck, however, they might be the sign of an underlying structural weakness that needs to be examined. You might consider hiring a marine surveyor or having a qualified boat maintenance worker take a look at the problem to ensure that it isn’t serious.
Color Matching.
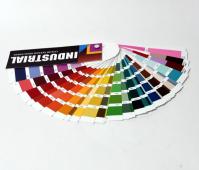
RAYPLEX has a great web page that will give
you all the information you need to get a good gel coat match. If it's
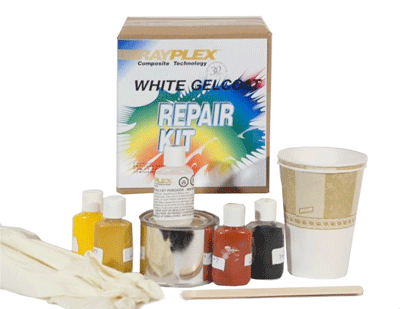
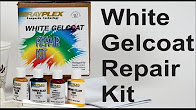
just a small white or off white repair Rayplex has repair kits with a simple
color guide for matching. Our customers have complemented us on how well it
works. When finished you couldn't see where the repair was made.
Click
below for more information.
Check out these instructional videos:

The Repair
Before you begin, wash the area with soap and water and rinse it thoroughly. If the surface is oxidized, restore it with a rubbing compound so you’ll be able to match its colour accurately. Once the surface is clean and dry, mark off the repair area with masking tape.
Next, gouge out small, narrow cracks (and scratches that are too deep to remove with rubbing compound) until they are wide enough to fill with gelcoat paste. A miniature grinding tool like a Dremel is ideal, but the sharp point of a can opener will work too. (If you don’t open the crack, you won’t be able to force the gelcoat into the repair area or expose enough surface area for the repair to adhere.) Then sand lightly with 220-grit sandpaper. After sanding, thoroughly clean the area with acetone to remove the sanding residue and any waxes or other contaminants that might interfere with the bond between the damaged surface and gelcoat. Be sure to provide adequate ventilation and proper protection for your skin and eyes whenever you work with acetone.
The next step is to match the colour of your existing gelcoat. Start with a white or neutral gelcoat paste (not resin) and begin adding tiny amounts of coloring agent. Mix several test batches of gelcoat and pigment, add hardener and allow them to cure (gelcoat changes colour during the curing process). Once you’ve found an acceptable match (an exact one is nearly impossible), mix a final batch using the same ratio.
Next, using a putty knife, fill the areas to be repaired with the paste you’ve mixed. Force out any air holes and be sure to overfill, as gelcoat has a tendency to shrink as it cures. When you are finished filling, seal the repair off from the air with a PVA curing agent or a piece of Saran Wrap or wax paper – gelcoat does not cure properly when exposed to air.
Once the gelcoat has fully cured, sand the repair smooth (wet sanding works particularly well with gelcoat). You can start with 220-grit sandpaper and, for a really slick surface, finish with at least 400- or 600-grit. Finally, apply a coat of high-quality marine polish and your repair is complete. Please see our YouTube video on Buffing & Polishing
Fiberglass Repair Selection Chart
|
Problem |
Procedure |
Suggested Products |
Helpful Tools |
| Cosmetic Gelcoat
Surface Damage ·1 Small Scratches·2 Hairline/Spider Cracks·3 Gelcoat Chips |
1. Apply product to repair area. 2. Sand repaired area flush with surrounding surface. 3. Buff. |
·1 Quick Fix Gelcoat Patch·2 Gelcoat Repair Kits·3 Gelcoat/Coloring Agent |
|
| Gelcoat Surface
Damage ·1 Dings·2 Dents·3 Gouges·4 Small Holes |
1. Mix base and reactor to proper ratio. 2. Apply product to repair area. 3. Sand repaired area flush with surrounding surface. 4. Buff. |
· Gelcoat Repair Kit· Marine Surface Putty· Gelcoat |
|
| Structural
Repair ·1 Holes·2 Pumctures·3 Delamination |
1. Remove and sand damaged material. 2. Sand surrounding area. 3. Use polyester resin and fiberglass to fill voids and bond components. 4. Sand area flush with surrounding surface. 5. Coat surface with gelcoat. |
· ER Kit· Fiberglass Repair Kits· Epoxy Sticks· Marine Structural Filler· Polyester Resin with Catalyst· Fiberglass Cloth / Roving / Mat· Gelcoat |
|
| Major Structural
Repair* ·1 Large Holes·2 Core Damage·3 Structural Reinforcement |
1. Remove and sand damaged material. 2. Sand surrounding area. 3. Use epoxy or vinylester resin for strength. 4. Add fiberglass cloth, roving or mat to fill voids and add reinforcement. 5. Sand area flush with surrounding surface. 6. Coat surface with gelcoat. |
· Resin with Hardener- West System - Seafit Epoxy ·1 Fiberglass Cloth / Roving / Mat·2 Gelcoat/Coloring Agent·3 Fillers |